

How to Connect Niwa to an AI Provider
Connect Niwa through supported ChatGPT sign-in, OpenAI API or OpenRouter. Save the active mode, select a model and verify a customer-chat reply.
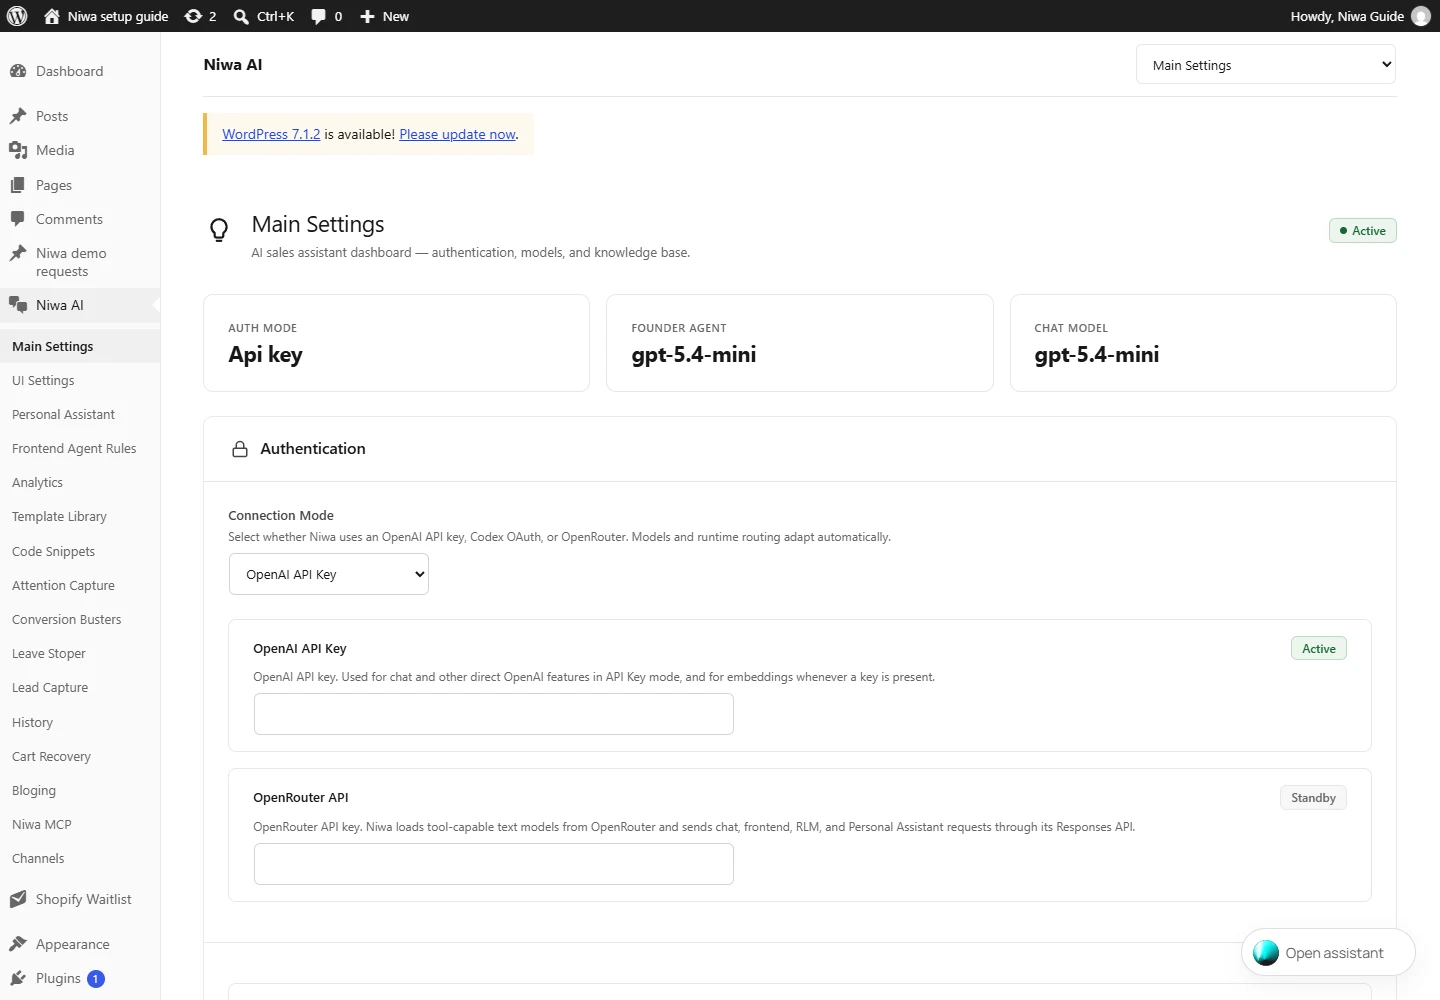
To connect Niwa to an AI provider, open Niwa AI → Main Settings → Authentication, select the connection mode and complete its sign-in or API-key setup. Save authentication, reload the page, choose an available chat model and save General Settings. Verify the connection with a customer-chat question whose answer you can check.
Niwa supports a ChatGPT account connection through Codex OAuth, an OpenAI API key and OpenRouter API. Choose the route you intend to use before entering credentials. A saved account can remain connected while another mode is active, so connection status and the selected mode both matter.
Choose between subscription sign-in and API billing
With Niwa's supported own-subscription connection, Niwa adds no extra AI usage charges or Niwa-imposed usage limits. Your AI provider's account eligibility, available models and allowance still apply.
An API-key connection follows that provider's API billing and account controls. OpenAI treats ChatGPT subscriptions and the API platform as separate billing systems. Its billing guidance explains the distinction.
Choose the account your business is authorized to use. Review who owns it, who can reconnect it and which provider data settings apply. For installation-specific field names, keep the Niwa setup handbook open alongside WordPress.
Connect your supported ChatGPT account
In Main Settings → Authentication, choose Connection Mode → Codex OAuth and click Save Auth Settings. Select Connect Codex OAuth and keep the WordPress page open.
Niwa displays a verification code and an Open Verification button. Open the verification page, check that it belongs to auth.openai.com, sign in to the intended account and approve the code shown by your own installation. Return to WordPress and wait for Connected.
If the code expires before approval, use Restart to begin a new attempt. Use Reconnect when an existing connection needs renewal. Do not approve a code that someone else sends you or share the code to have another person finish sign-in.
Your account or workspace may require device-code authorization to be enabled. Follow the available account controls described in OpenAI's authentication documentation. Review the account's data controls as part of connecting business information.
Use an OpenAI API key when that is your chosen route
Create a key in the intended OpenAI Platform project and confirm that the project has usable API billing and the permissions required for your model. Paste the secret into OpenAI API Key in Niwa, select OpenAI API Key as the connection mode and save authentication.
Keep the key in the designated authenticated settings field. Do not put it in Frontend Agent Rules, page content, a greeting, browser code or a public screenshot. OpenAI's API-key safety guidance recommends keeping credentials private and protecting their use.
If a key is exposed, replace it through the provider's account controls and update the connection. Removing a visible copy does not make the exposed credential private again.
Connect OpenRouter with its own credential
Create an OpenRouter API key in the intended account. Enter it in Niwa's OpenRouter API Key field, select OpenRouter API and click Save Auth Settings.
Use an inference API key, not a separate management key. OpenRouter documents its API-key authentication in the authentication reference. Check the key's available credit, restrictions and the model access you intend to use.
Select from the models Niwa makes available to the active OpenRouter connection. Separate OpenAI-specific services may use their own OpenAI credential; check those service requirements rather than assuming the chat connection covers them.
Select the customer-chat model and verify a reply
After saving authentication, reload Main Settings. Choose the Chat Model from the available list and click Save General Settings. This save action is separate from Save Auth Settings.
Enable and configure the public chat if you have not done so already. Ask a simple question in a private browser window, such as the delivery condition on a published policy page. Check both that a reply arrives and that it uses the correct business information. An answer proves more about the connection than a saved credential alone.
The Personal Assistant has its own Founder Connection Mode and Founder Model. A working admin conversation is useful evidence for that interface, but it does not establish which model the public customer chat uses. Configure and check each interface you plan to use.
Troubleshoot the connection without changing the knowledge base
If OAuth says Connected but the active mode is still API Key, select Codex OAuth and save authentication. A connection in Standby is saved but not selected for that route.
If authentication is rejected, inspect the exact provider message, account permissions and credential. If a model is missing, reload after saving authentication and check its availability for that account. If a request reaches a usage limit, review the provider allowance or billing controls.
A reply that arrives but contains a wrong policy is a separate information problem. Check the source page, index and business rules before repeatedly reconnecting the account. The complete assistant setup guide shows how connection and site knowledge work together.
Review Niwa's safety information for the data sent to connected services. If you need setup help, contact Niwa with the selected mode, affected interface and a redacted error message. Keep credentials private.

